Difference between revisions of "Installing ruby with cucumber on a windows machine"
| Line 29: | Line 29: | ||
| − | <h2>Installing the | + | <h2>Installing the plugins</h2> |
<p>Now the installation of Ruby is complete, we can start installing the necessary plugins. These are so called “Gems” | <p>Now the installation of Ruby is complete, we can start installing the necessary plugins. These are so called “Gems” | ||
in Ruby. (A ruby is a gem, so the creators decided to call their plugins gems)</p> | in Ruby. (A ruby is a gem, so the creators decided to call their plugins gems)</p> | ||
| − | Copy the code written below and paste it in the CMD (right click, paste) | + | Copy the code written below and paste it in the CMD (right click, paste). While installing do not copy something else. |
<source> | <source> | ||
gem update --system | gem update --system | ||
gem install lapis_lazuli --no-ri --no-rdoc | gem install lapis_lazuli --no-ri --no-rdoc | ||
</source> | </source> | ||
| − | + | Installing ''lapis_lazuli'' also installs the gems ''cucumber'', ''Selenium-webdriver'' and ''watir-webdriver''. | |
| − | ''' | ||
| − | |||
| − | <h2>Installing | + | <h2>Installing drivers</h2> |
| + | For executing the test framework you need to have the following browsers installed: ''Firefox'' and ''Chrome'' | ||
| + | To let the framework communicate with the browsers we need to download 2 drivers and place them in the ruby directory ''./ruby/bin'' | ||
| + | Download the latest version of [https://sites.google.com/a/chromium.org/chromedriver/downloads | chromedriver] | ||
| + | Download the latest version of https://github.com/mozilla/geckodriver/releases | geckodriver] | ||
| − | <h2>Installing ANSICON | + | <h2>Installing ANSICON</h2> |
<p> When ANSICON is installed the test results in CMD will be colored. This will greatly improve the readability when working with Cucumber | <p> When ANSICON is installed the test results in CMD will be colored. This will greatly improve the readability when working with Cucumber | ||
* Download and extract the files [https://github.com/adoxa/ansicon/releases/download/v1.66/ansi166.zip | ansi166.zip] | * Download and extract the files [https://github.com/adoxa/ansicon/releases/download/v1.66/ansi166.zip | ansi166.zip] | ||
| Line 55: | Line 57: | ||
More information can be found here [http://qastuffs.blogspot.nl/2011/02/how-to-install-ansicon-for-cucumber-to.html | '''source:'''] | More information can be found here [http://qastuffs.blogspot.nl/2011/02/how-to-install-ansicon-for-cucumber-to.html | '''source:'''] | ||
| + | <h3>That's it! You're now ready to start setting up your cucumber project. You can read more about this in the next | ||
| + | article.</h3> | ||
| + | |||
| + | |||
| + | <h2>Extra information about the installations</h2> | ||
| + | <p>This section is for you to have a better understanding of what is happening during the installation. And what the | ||
| + | commands we're using in console actually mean.</p> | ||
| + | |||
| + | <p>When we installed ruby, we checked a checkbox saying "Add ruby executables to your PATH". What we did here, was | ||
| + | making ruby commands globally accessible in the console.</p> | ||
| + | |||
| + | <p>Now because these commands are global, we can go to devkit folder and write "ruby dk.rb install". Where we are | ||
| + | actually saying: "Hey Ruby! I want you to look at this file dk.rb I have here and install it".</p> | ||
| + | |||
| + | <p>Same thing happens with "gem install lapis_lazuli": "Hey Ruby, I want you to do something with a gem, which is | ||
| + | installing and the name is lapis_lazuli". After which Ruby is going to look online in their software system | ||
| + | looking for a gem called lapis_lazuli.</p> | ||
{| class="wikitable collapsible collapsed" | {| class="wikitable collapsible collapsed" | ||
| − | ! colspan="2"| More information about | + | ! colspan="2"| More information about gems installed |
|- | |- | ||
| <code>gem update --system</code> | | <code>gem update --system</code> | ||
| Will update all default gems installed with Ruby (can be outdated, even though you've just installed Ruby) | | Will update all default gems installed with Ruby (can be outdated, even though you've just installed Ruby) | ||
| − | |||
| − | |||
| − | |||
| − | |||
| − | |||
| − | |||
| − | |||
| − | |||
| − | |||
| − | |||
|- | |- | ||
| <code>gem install selenium-webdriver --no-ri --no-rdoc</code> | | <code>gem install selenium-webdriver --no-ri --no-rdoc</code> | ||
| Line 84: | Line 93: | ||
| The software that will run the scripts from console. | | The software that will run the scripts from console. | ||
|} | |} | ||
| − | |||
| − | |||
| − | |||
| − | |||
| − | |||
| − | |||
| − | |||
| − | |||
| − | |||
| − | |||
| − | |||
| − | |||
| − | |||
| − | |||
| − | |||
| − | |||
| − | |||
| − | |||
[[Category:Installing ruby with cucumber]] | [[Category:Installing ruby with cucumber]] | ||
Revision as of 16:50, 13 March 2017
Contents
Installing Ruby
- Download and the latest version of Ruby for windows 32 bit on http://rubyinstaller.org/downloads/.
- We're installing Ruby 32 bit version because it's more reliable than the 64 bit version
- Accept the terms
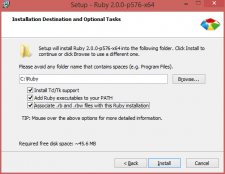
- Install Ruby in the default directory (for example Ruby version 2.3.3 will be installed in C:\Ruby23)
- Check all 3 checkboxes
Installing DevKit
- Download and open the latest Devkit for Windows 32 bit on http://rubyinstaller.org/downloads/
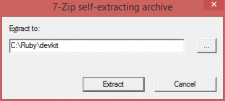
- In your ruby directory create a new Folder with the name: devkit
- Extract the Devkit into the newly created folder
- Open command prompt
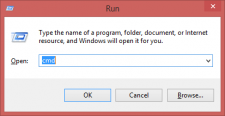
- Go to Run (Windows Key + R)
- Write
CMD - Press enter
- In CMD go to your ruby directory (for example write the following
cd C:\Ruby\devkit) - Write
ruby dk.rb init - Write
ruby dk.rb install
Installing the plugins
Now the installation of Ruby is complete, we can start installing the necessary plugins. These are so called “Gems” in Ruby. (A ruby is a gem, so the creators decided to call their plugins gems)
Copy the code written below and paste it in the CMD (right click, paste). While installing do not copy something else.
gem update --system
gem install lapis_lazuli --no-ri --no-rdoc
Installing lapis_lazuli also installs the gems cucumber, Selenium-webdriver and watir-webdriver.
Installing drivers
For executing the test framework you need to have the following browsers installed: Firefox and Chrome To let the framework communicate with the browsers we need to download 2 drivers and place them in the ruby directory ./ruby/bin Download the latest version of | chromedriver Download the latest version of https://github.com/mozilla/geckodriver/releases | geckodriver]
Installing ANSICON
When ANSICON is installed the test results in CMD will be colored. This will greatly improve the readability when working with Cucumber
- Download and extract the files | ansi166.zip
- Open CMD and navigate to the directory
- Navigate to x64 (if you have a 64 bit machine) otherwise navigate to x86
- To go to the directory write something like
cd C:\ANSICON\x64
- Type
ansicon.exe -iand ansicon will be installed.
More information can be found here | source:
That's it! You're now ready to start setting up your cucumber project. You can read more about this in the next article.
Extra information about the installations
This section is for you to have a better understanding of what is happening during the installation. And what the commands we're using in console actually mean.
When we installed ruby, we checked a checkbox saying "Add ruby executables to your PATH". What we did here, was making ruby commands globally accessible in the console.
Now because these commands are global, we can go to devkit folder and write "ruby dk.rb install". Where we are actually saying: "Hey Ruby! I want you to look at this file dk.rb I have here and install it".
Same thing happens with "gem install lapis_lazuli": "Hey Ruby, I want you to do something with a gem, which is installing and the name is lapis_lazuli". After which Ruby is going to look online in their software system looking for a gem called lapis_lazuli.
| More information about gems installed | |
|---|---|
gem update --system
|
Will update all default gems installed with Ruby (can be outdated, even though you've just installed Ruby) |
gem install selenium-webdriver --no-ri --no-rdoc
|
Gem that allows communication with browsers |
gem install watir-webdriver --no-ri --no-rdoc
|
Layer on top of Selenium that simplifies browser interaction |
gem install lapis_lazuli --no-ri --no-rdoc
|
Test automation gem that will enforce best practices, forcing the TA engineer to produce better code. |
gem install cucumber --no-ri --no-rdoc
|
The software that will run the scripts from console. |


